
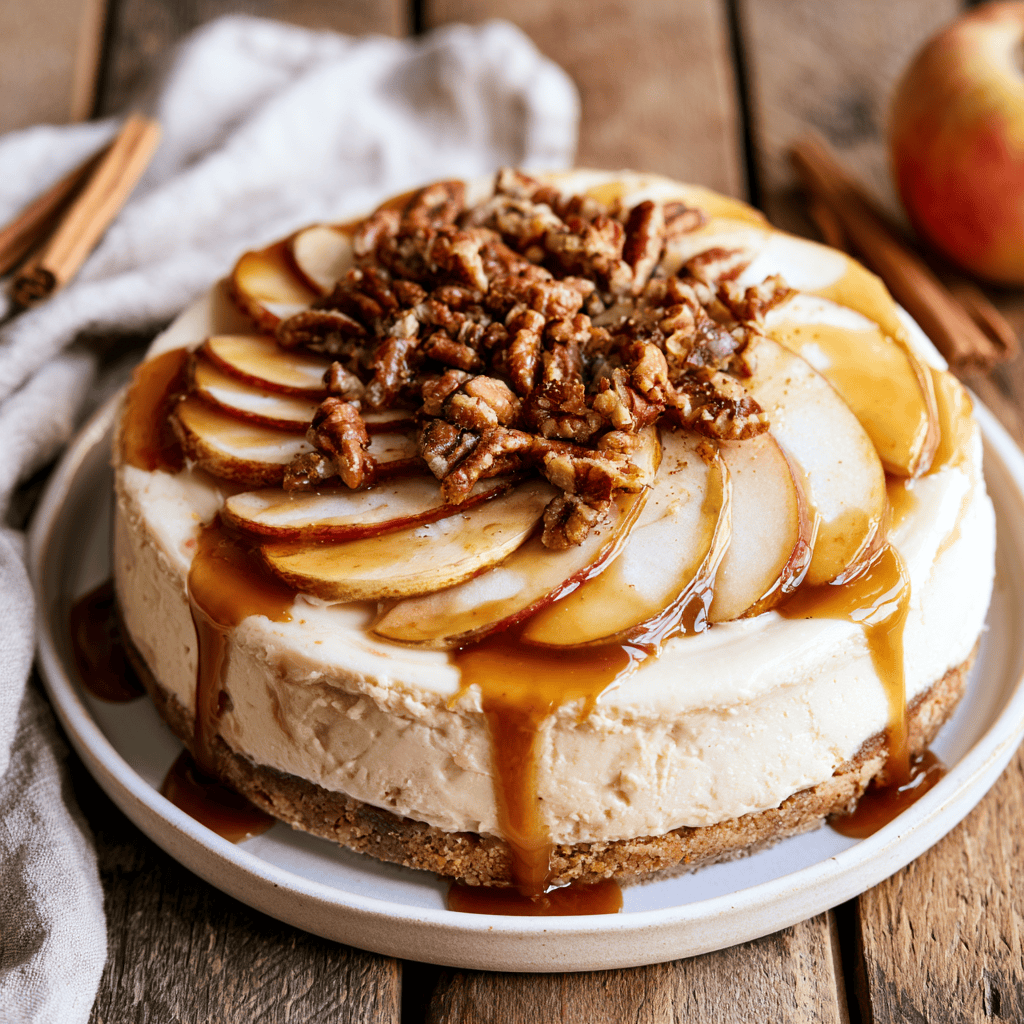
No-Bake Creamy Apple Butter Cheesecake
Golden and crispy on the outside, this No-Bake Creamy Apple Butter Cheesecake offers a velvety, melt-in-your-mouth experience that captures the essence of crisp autumn days. With a buttery, spiced graham cracker crust and a luscious, cloud-like filling, every bite delivers a perfect balance of tangy cream cheese and sweet, concentrated apple goodness. It is the ultimate dessert for those who crave elegance without the stress of a water bath or long oven hours.
Why You’ll Love This No-Bake Creamy Apple Butter Cheesecake:
- Zero Oven Time: You can skip the hassle of preheating the oven and monitoring temperatures during a long bake. This recipe relies on chilling to set, making it perfect for warm days or when your oven is already occupied with other dishes.
- Silky Texture: The combination of whipped cream and cream cheese creates a mousse-like consistency that is incredibly light yet decadent. It melts beautifully on the tongue, providing a sophisticated mouthfeel that satisfies every sweet tooth.
- Deep Orchard Flavor: By using apple butter instead of fresh fruit, you get a concentrated, intense flavor profile that shines through the richness of the cheese. The natural spices within the apple butter infuse the entire cake with warmth and comfort.
- Make-Ahead Convenience: This dessert actually tastes better after it has had time to rest and firm up in the refrigerator. Preparing it the day before your event ensures you have a stress-free hosting experience when guests arrive.
- Impressive Presentation: With its beautifully fanned apple slices and crunchy pecan topping, this cheesecake looks like it came straight from a gourmet bakery. It is a stunning centerpiece that brings a rustic, inviting charm to any table setting.
- Versatile Ingredient Base: The neutral yet creamy base serves as a perfect canvas for various toppings or crust adjustments. Whether you prefer extra caramel or a hint of spice, this recipe adapts effortlessly to your personal cravings.
- Simple Cleanup: Because you only use a few bowls and a mixer, your kitchen stays organized and clean throughout the process. This efficiency makes it a fantastic option for busy weeknights or spontaneous weekend gatherings.

Ingredients Needed:
- ☐
1 ½ cups (180g) graham cracker crumbs — crush finely for a uniform crust
- ☐
¼ cup (50g) granulated sugar — provides the perfect hint of sweetness
- ☐
½ cup (113g) unsalted butter, melted — ensure it is fully liquid for even binding
- ☐
24 oz (680g) cream cheese, softened — room temperature is vital for smoothness
- ☐
1 ½ cups (180g) powdered sugar — sift to remove any stubborn clumps
- ☐
1 cup (240ml) apple butter — the star of the show
- ☐
1 teaspoon vanilla extract — adds a warm, aromatic depth
- ☐
1 cup (240ml) heavy cream — ensure it is cold for the best volume
- ☐
2 tablespoons (28g) unsalted butter, melted — for greasing the pan
- ☐
1 apple, thinly sliced — choose a crisp variety like Honeycrisp
- ☐
1 tablespoon lemon juice — keeps the apple slices bright and fresh
- ☐
¼ cup (30g) chopped pecans, toasted — adds a delightful earthy crunch
- ☐
1 tablespoon honey or caramel drizzle — optional, but highly recommended for a glossy finish
Essential Equipment:
- 🔧 9-inch Springform Pan — The removable sides are crucial for releasing the delicate cheesecake without damaging its smooth edges.
- 🔧 Electric Hand Mixer — Essential for achieving the light, airy consistency required for the cream cheese and whipped cream layers.
- 🔧 Rubber Spatula — Necessary for folding the whipped cream gently into the base to maintain the structural integrity and fluffiness of the filling.
- 🔧 Offset Spatula — Helps you smooth the top of the cheesecake into a perfectly flat, professional-looking surface before it sets in the fridge.
Recipe Overview:
🍳 Cook: 0 min
⏰ Total: 30 min (plus setting time)
👥 Serves: 8
📊 Difficulty: Easy
Step-by-Step Instructions:
Follow these precise steps to create the perfect No-Bake Creamy Apple Butter Cheesecake in your own kitchen.
Step 1: Preparing the Crust
- ○Lightly grease a 9-inch springform pan with the 2 tablespoons melted butter, ensuring the sides and bottom are well-coated to prevent sticking.
- ○In a medium bowl, combine graham cracker crumbs and granulated sugar until the mixture looks uniform and smells slightly sweet. Pour in the melted butter and stir with a fork until the mixture looks like wet, dark sand and holds together when pressed between your fingers.
- ○Press the crumb mixture firmly into the bottom of the prepared pan, using the cool, flat bottom of a measuring cup to compact it evenly into a solid base. Place the pan in the freezer while you make the filling to ensure the crust sets into a crisp foundation.
Step 2: Creating the Velvety Filling
- ○In a large mixing bowl, beat the softened cream cheese with an electric mixer on medium speed until it is completely smooth and creamy, about 2 minutes. Scrape down the sides of the bowl with a spatula to ensure every bit of cheese is incorporated and lump-free.
- ○Gradually add the powdered sugar, beating on low speed until it is fully incorporated, then increase the speed until the mixture is light, fluffy, and silky in texture. The mixture should feel light as air and have a smooth, glossy sheen that indicates the sugars are fully dissolved.
- ○Blend in the apple butter and vanilla extract, watching as the mixture transforms into a beautiful pale amber hue that is highly fragrant with warm, comforting spices. Mix until the color is completely uniform, ensuring no streaks of plain cream cheese remain.
Step 3: Whipping and Folding
- ○In a separate chilled bowl, whip the heavy cream on high speed until stiff peaks form, watching closely for the moment the cream holds its shape and looks wonderfully glossy. The cream should be thick and billowy, indicating it is ready to be folded into the base.
- ○Gently fold the whipped cream into the cream cheese mixture in three separate additions, using a light rubber spatula to maintain the airy structure. Fold just until no white streaks remain, ensuring the final filling is perfectly light and consistent throughout.
- ○Remove the crust from the freezer and pour the creamy filling over it, using an offset spatula to smooth the top into a perfectly level surface. Give the pan a few gentle taps against the counter to release any trapped air bubbles, ensuring a dense and smooth slice.
Step 4: Chilling and Garnishing
- ○Cover the pan tightly with plastic wrap and refrigerate for at least 6 hours, or ideally overnight, until the cheesecake is set and feels firm to the touch. This patience allows the flavors to meld and the texture to reach its peak.
- ○Before serving, toss the thinly sliced apples in lemon juice to keep them vibrant and prevent browning, ensuring your garnish remains picture-perfect. Run a thin, sharp knife around the edge of the pan to release the tension before carefully opening the springform.
- ○Arrange the apple slices in a decorative fan pattern on top of the cheesecake, sprinkle with the toasted pecans for a satisfying crunch, and drizzle with honey or caramel for a final touch of sweetness. Serve chilled for the best experience.
Tips for Success:
💡 Pro Tips
- ✔️ Use full-fat cream cheese for the best texture and flavor, as lower-fat versions can lead to a runny filling that won’t set properly.
- ✔️ Ensure cream cheese is completely softened to room temperature before beating, as cold blocks will result in unsightly lumps in your otherwise smooth filling.
- ✔️ Whip the heavy cream just until stiff peaks form; over-whipping can cause the fat to separate, making the cream grainy and ruining the texture.
- ✔️ Chill the cheesecake for at least 6 hours, but overnight is highly recommended to allow the structure to firm up completely for clean, beautiful slices.
- ✔️ For clean, professional slices, use a sharp knife dipped in hot water and wipe the blade completely dry between every single cut.
- ✔️ If your kitchen is very warm, keep the cream cheese and heavy cream in the fridge until the very last second to ensure they whip and fold together with ease.
Variations & Substitutions:
- 🔄 Pumpkin Spice: Replace the apple butter with high-quality pumpkin puree and add 1 teaspoon of pumpkin pie spice to the mixture. This is a wonderful seasonal variation that brings a warm, earthy flavor to the dessert.
- 🔄 Gingersnap Crust: Swap the traditional graham crackers for crushed gingersnap cookies. The spicy ginger notes pair perfectly with the apple butter and add a lovely crunch to every bite.
- 🔄 Chocolate Swirl: Fold in ½ cup of high-quality melted dark chocolate before chilling the cheesecake. This adds a sophisticated, bittersweet element that balances the sweetness of the apple butter.
- 🔄 Caramel Apple: Add a generous layer of salted caramel sauce over the top just before adding the apple garnish. This extra layer provides a salty-sweet contrast that elevates the entire dish.
- 🔄 Gluten-Free: Use certified gluten-free graham crackers or your favorite gluten-free cookie crumbs to create a safe, inclusive dessert for those with sensitivities. Ensure the butter used is also high quality to maintain the flavor.
Serving Suggestions:
- 🍽️ Serve alongside a dollop of freshly whipped cream that has been lightly sweetened with a touch of maple syrup for extra warmth.
- 🍽️ Pair a slice with a warm cup of spiced cider or a light tea to highlight the autumnal notes found within the apple butter filling.
- 🍽️ For a dramatic presentation, serve on individual white ceramic plates with a light dusting of cinnamon or nutmeg over the top.
- 🍽️ Add a few extra toasted pecans around the plate for a beautiful, rustic look that mimics the natural colors of the season.
Health Benefits:
- 💚 Rich in Calcium: Cream cheese is a good source of calcium, which is essential for maintaining strong bones and healthy teeth. Including it in your diet, even in dessert form, helps contribute to your daily mineral intake.
- 💚 Antioxidant Boost: Apples used in the apple butter contain various phytonutrients and antioxidants that support overall immune health. These natural compounds help combat oxidative stress in the body.
- 💚 Healthy Fats: Pecans are packed with heart-healthy monounsaturated fats and fiber, providing a nutrient-dense boost to this indulgent treat. They also offer a natural energy source that keeps you satisfied longer.
- 💚 Vitamin Content: Dairy products like heavy cream provide essential vitamins such as Vitamin A and B12, which are important for vision and nerve function. Enjoying this dessert in moderation allows you to reap these nutritional benefits.
Nutrition Facts:
Storage & Reheating:
- ❄️ Fridge: Store the cheesecake covered in the refrigerator for up to 5 days. Use an airtight container or wrap it securely in plastic wrap to maintain its freshness and prevent it from absorbing fridge odors.
- 🧊 Freezer: Wrap the entire cheesecake in two layers of plastic wrap and one layer of foil to prevent freezer burn; it will stay delicious for up to 2 months. For individual slices, freeze them on a baking sheet before wrapping each one individually.
- ♨️ Reheat: This cheesecake is best served cold, but if you prefer a softer texture, let it sit at room temperature for about 10 minutes before serving. Avoid heating it in an oven or microwave, as the structure will melt.

Frequently Asked Questions:
Can I use a different crust?
Yes, you can absolutely experiment with different crusts for this cheesecake. Gingersnap cookies, vanilla wafers, or even shortbread cookies work well if you want a different flavor profile. Just ensure the ratio of crumbs to melted butter remains similar to maintain the structural integrity.
Why did my cheesecake not set properly?
The most common cause for a loose cheesecake is not chilling it long enough or using low-fat cream cheese. Ensure you use full-fat blocks and give it at least 6 hours, ideally overnight, to firm up. If the room was too warm during prep, it may also take longer to set in the fridge.
Can I make this dairy-free?
While this specific recipe relies on cream cheese and heavy cream, you can substitute them with high-quality dairy-free cream cheese alternatives and coconut cream. Note that the texture may vary slightly compared to the traditional version due to the different fat content in plant-based alternatives.
Is it possible to bake this recipe?
This is a no-bake recipe specifically designed for its airy, mousse-like texture that develops through chilling. Baking it would likely alter the consistency significantly and could cause the filling to separate or lose its light, creamy quality. We recommend sticking to the no-bake method for the best results.
How do I prevent the apple slices from turning brown?
The lemon juice is the secret to keeping your apple slices looking fresh and bright. By tossing them thoroughly in the juice, you create an acidic barrier that prevents oxidation. If you are preparing the garnish well in advance, keep the slices in a bowl of cold water with lemon juice until you are ready to assemble.
More Delicious Dishes:
- 🍴 Roasted Butter Shrimp Recipe — A quick and flavorful main course that brings restaurant-quality seafood to your home.
- 🍴 Garlic Butter Bread Rolls — Soft, buttery rolls that are the perfect side to any hearty dinner or soup.
- 🍴 Creamy Chicken Tortilla Soup — A comforting and robust soup that is packed with flavor and perfect for chilly evenings.
Conclusion:
This No-Bake Creamy Apple Butter Cheesecake is more than just a dessert; it is a celebration of seasonal flavors and simple, effective techniques. By following these steps, you can easily create a masterpiece that will delight your friends and family alike. Whether you are hosting a dinner party or just treating yourself, this recipe is sure to become a staple in your collection. Follow us on Pinterest for more delicious recipes!
No-Bake Creamy Apple Butter Cheesecake
Ingredients
Equipment
Method
- Grease a 9-inch springform pan with 2 tablespoons melted butter.
- Combine graham cracker crumbs, granulated sugar, and melted butter; press into the bottom of the pan and chill.
- Beat cream cheese until smooth, then gradually add powdered sugar until fluffy.
- Mix in apple butter and vanilla extract until uniform.
- Whip heavy cream in a separate bowl until stiff peaks form.
- Gently fold the whipped cream into the cream cheese mixture.
- Pour filling over the crust and smooth the top.
- Refrigerate for at least 6 hours or overnight.
- Toss apple slices in lemon juice and arrange on top with pecans and optional drizzle before serving.
